Table of Contents
What is protocol Mapper ?
- Keycloak can share information or an Application can pull information from the keycloak via, the token. Access token and ID token are the token used by the application. Inside the token, details are available as token claims.
- The claims in the token, can be customized with application specific details. This is done by adding Mappers to the clients
- Keycloak provide an endpoint for getting user-info. Protocol Mappers will provide the option to add custom claims in the details from the userinfo end point
- We have seen the real use of token claims, in an example explained in another article, where we are utilized the claim "role" available in the token
In this Article, we will see how to add a custom claim in the token available from the keycloak. We will be adding a custom user-attribute clubs as one of the claim in the token
Setup Details
- Rocky Linux 8 VM on VirtualBox
- RAM 4 GB
- 2 VCPUs
- 23 GB HD
- Host OS: Windows 10
Pre-Requisites
- keycloak should be installed and running
- A new realm (linux-data-hub) should be created
- Create a new client (ldh-client) in the new realm
- Create sample users (casy) in the new realm with credentials
- Create custom attributes to the user (clubs)
Existing Claim
- As mentioned in the pre-requisites, we are having a user "casy" in the new realm linux-data-hub. We are getting access token using a client ldh-client
- Below code snippet shows the claims present in the Access token, we will using this as a reference
[root@linux-acl ~]# token=$(curl -s -k -g -d "client_id=ldh-client" -d "username=casy" -d "password=1234" -d "grant_type=password" -d "client_secret=" "http://10.39.251.173:8080/realms/linux-data-hub/protocol/openid-connect/token" | sed 's/.*access_token":"//g' |sed 's/".*//g');jq -R 'split(".") | .[1] | @base64d | fromjson' <<< $token
{
"exp": 1665509500,
"iat": 1665509200,
"jti": "5826dde5-1ac2-41eb-a40c-37f4f17dd05a",
"iss": "http://10.39.251.173:8080/realms/linux-data-hub",
"aud": "account",
"sub": "2369f9b6-b46c-4ae6-bf03-a7f99347600f",
"typ": "Bearer",
"azp": "ldh-client",
"session_state": "4f197e46-f44c-497e-a881-3a8aa1e3c77f",
"acr": "1",
"allowed-origins": [
"http://10.39.251.173:3000"
],
"realm_access": {
"roles": [
"offline_access",
"default-roles-linux-data-hub",
"uma_authorization"
]
},
"resource_access": {
"ldh-client": {
"roles": [
"manager"
]
},
"account": {
"roles": [
"manage-account",
"manage-account-links",
"view-profile"
]
}
},
"scope": "email profile role_aa",
"sid": "4f197e46-f44c-497e-a881-3a8aa1e3c77f",
"email_verified": false,
"name": "Ayushman H K",
"preferred_username": "casy",
"given_name": "Ayushman",
"family_name": "H K",
"email": "[email protected]"
}
Add Custom User Attribute
- Navigate to the users in the realm (linux-data-hub) and select the user (casy)
- Navigate to attribute section of the user and add key & values
- For the sake of explanation, I'm adding an attribute named clubs and values as some random football/soccer clubs
- Below screen shot shows the same
Create Protocol Mappers
- We will be creating Mappers to the client (ldh-client) which we have created
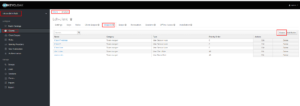
- Navigate to the realm (linux-data-hub) → Clients → ldh-client → Mappers
- Click on Create Button available in the Mappers page
Hint: We can create Protocol Mappers via Client Scopes also, in Addition to creating Mappers in the individual Clients. By doing this way, we can use this Mapper in any available client in the realm .
- Once navigated to the Create Protocol Mapper Page after clicking the Create button. We can fill the required details
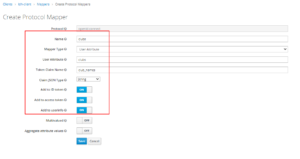
- Name can be any identifiable name which can be used to identify the mapper
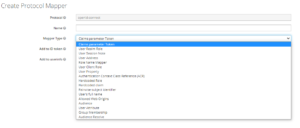
- Mapper Type is selected as User Attribute, as our aim is add a user attribute in the token
- Below Snippet shows, the list of available Mapper Type
- In User Attribute, we need to provide the User Attributes key name
- In Token Claim Name, we need to provide the claim name which we want in our Access/ID token or user info
- Rest Options present in the screen are self explanatory, if we want to add this claim in Access/ID/User Info . Make respective toggle switch is marked as ON
- Once all the required information is given, we can click on Save
- Below snippet shows the options selected and given details
Verify Claim in Token
- After creating the Mappers, we can verify if the new claim is added to the Token
- We will be using the same command which we have used before to fetch the token
- Upon fetching the token again, We can see that User Attribute named Clubs is added as Club_names in the token. Below snippet shows the same
[root@linux-acl ~]# token=$(curl -s -k -g -d "client_id=ldh-client" -d "username=casy" -d "password=1234" -d "grant_type=password" -d "client_secret=" "http://10.39.251.173:8080/realms/linux-data-hub/protocol/openid-connect/token" | sed 's/.*access_token":"//g' |sed 's/".*//g');jq -R 'split(".") | .[1] | @base64d | fromjson' <<< $token
{
"exp": 1665511104,
"iat": 1665510804,
"jti": "d6fa14a3-24b1-4cb1-9fb0-f7666bf2df77",
"iss": "http://10.39.251.173:8080/realms/linux-data-hub",
"sub": "2369f9b6-b46c-4ae6-bf03-a7f99347600f",
"typ": "Bearer",
"azp": "ldh-client",
"session_state": "a142779e-5a2b-4d6f-a5a4-ca006e1601c4",
"acr": "1",
"allowed-origins": [
"http://10.39.251.173:3000"
],
"resource_access": {
"ldh-client": {
"roles": [
"manager"
]
}
},
"scope": "email profile role_aa",
"sid": "a142779e-5a2b-4d6f-a5a4-ca006e1601c4",
"email_verified": false,
"club_names": "Santos,FC Barcelona,borussia dortmund fc",
"name": "Ayushman H K",
"preferred_username": "casy",
"given_name": "Ayushman",
"family_name": "H K",
"email": "[email protected]"
}


